
A free whiteboard animation maker turns your own images into a video where a hand appears to draw each scene on a white background. With the ClearAITools whiteboard video maker you can do it entirely in your browser: no software to install, no account to create, and no watermark on the finished MP4.
This guide walks through the whole process with screenshots, from choosing your images to downloading the video. You will also learn how filename timing works, which settings matter most, and how to get a clean result from your very first project.
Key takeaways
- Upload JPG or PNG images. Each image becomes one scene in your whiteboard animation.
- Set scene length by editing each duration box, by naming files with timestamps (
00-00.png,00-05.png), or by adding an MP3 or WAV voiceover. - Choose 480p, 720p HD or 1080p FHD, and a 16:9 (YouTube) or 9:16 (TikTok/Reels) format.
- Pick a drawing hand style, preview the result on the timeline, then export an MP4.
What is whiteboard animation?
Whiteboard animation is a video style in which images, diagrams and text are revealed as if a hand were drawing them on a whiteboard. Because viewers watch each idea appear stroke by stroke, the format suits explanations where you want the audience to follow one idea at a time.
Typical uses include:
- Explainer videos for YouTube channels and websites
- Classroom lessons, tutorials and staff training
- Short vertical videos for TikTok, Instagram Reels and YouTube Shorts
- Product walk-throughs and marketing explainers
- Storytelling, including Arabic and other right-to-left content
What the free whiteboard animation maker can do
If you want a whiteboard animation maker free of watermarks and sign-ups, here is what the ClearAITools tool includes, based on the settings you will see in the screenshots below.
| Feature | Options |
|---|---|
| Input images | JPG or PNG. Each image becomes an independent scene. |
| Voiceover | Optional MP3 or WAV file. Scenes can sync to your audio automatically. |
| Scene timing | Per-image duration, “Apply to All Images”, or timestamps in file names. |
| Output quality | 480p, 720p HD or 1080p FHD. |
| Aspect ratio | Auto, YouTube (16:9) or TikTok/Reels (9:16). |
| Drawing hand | Show or hide it. Five styles: Classic, Caucasian, Dark-skinned, Middle Eastern and Woman. |
| Text direction | Left to right (English) or right to left (Arabic). |
| Extras | Colored ending option and a video editor with a scenes timeline. |
| Export | MP4 with no watermark. |
| Privacy | Images and audio are processed in your browser. |
How to make a whiteboard animation video for free (5 steps)
The whole process takes only a few minutes once your images are ready.
Before you start: prepare one image per scene. Black line art, diagrams and simple sketches on a white background draw most clearly, while busy photographs look less convincing. Save your images as JPG or PNG.
Step 1: Open the tool and choose your images
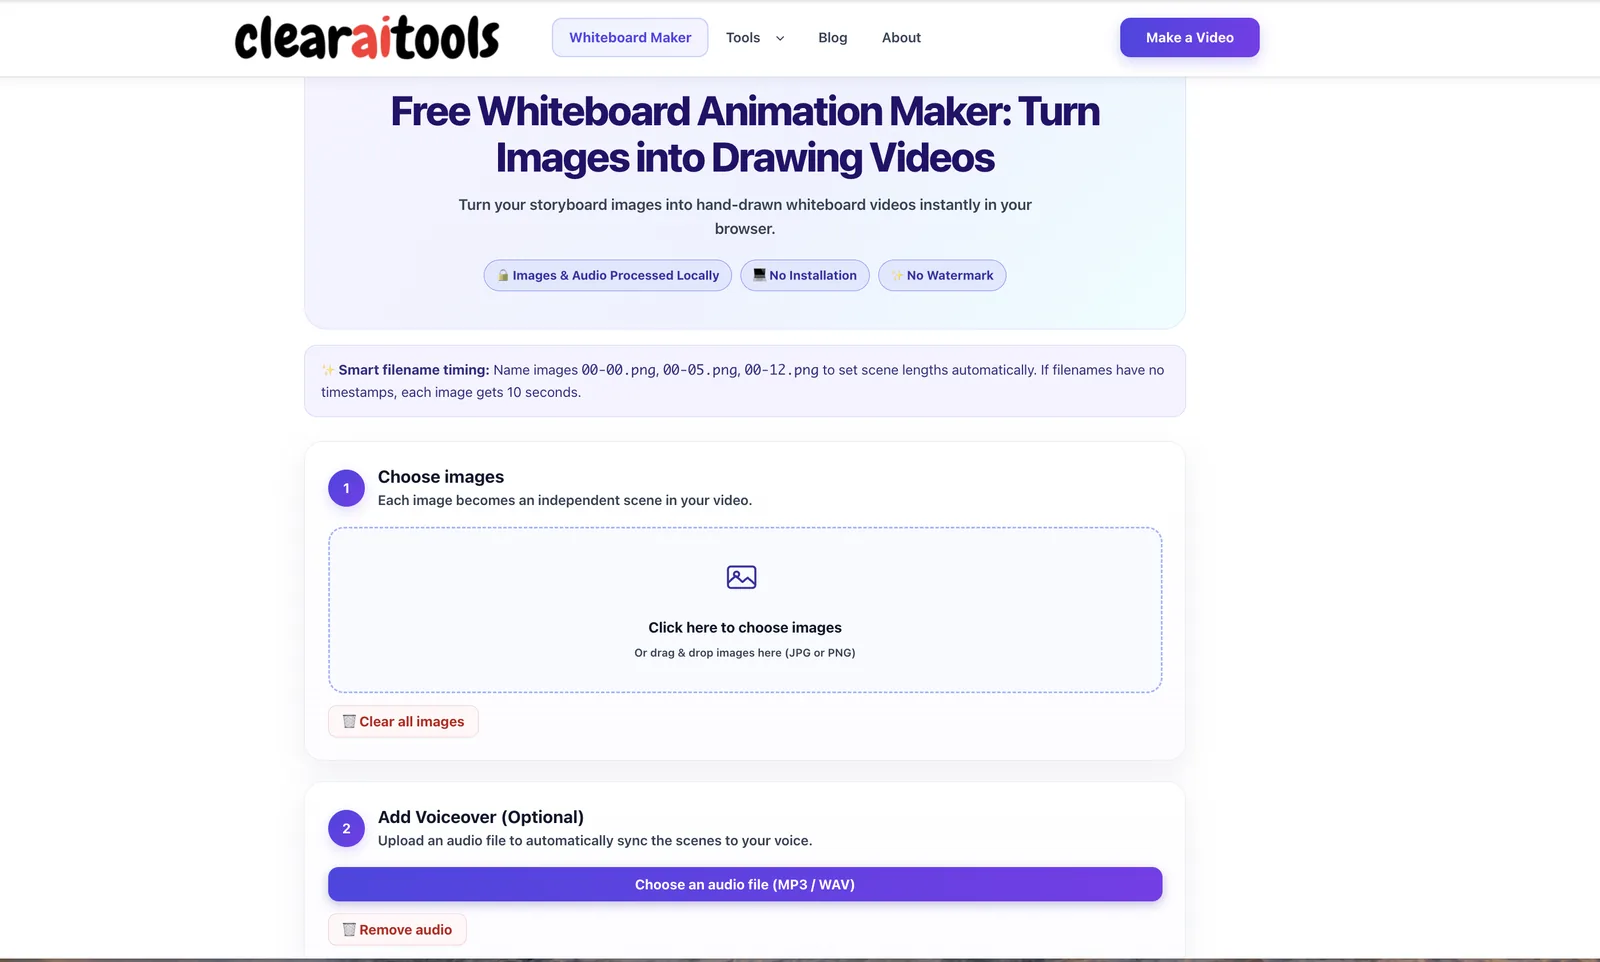
Open the free whiteboard animation maker. In the first box, click the upload area or drag and drop your images. Every image you add becomes its own scene.
Name your files in story order. The tool also shows a handy tip at the top of the page: name images 00-00.png, 00-05.png, 00-12.png and the scene lengths are set automatically. If your file names have no timestamps, each image gets 10 seconds. You can read how this works in the filename timing section below.
Step 2: Set scene durations or add a voiceover
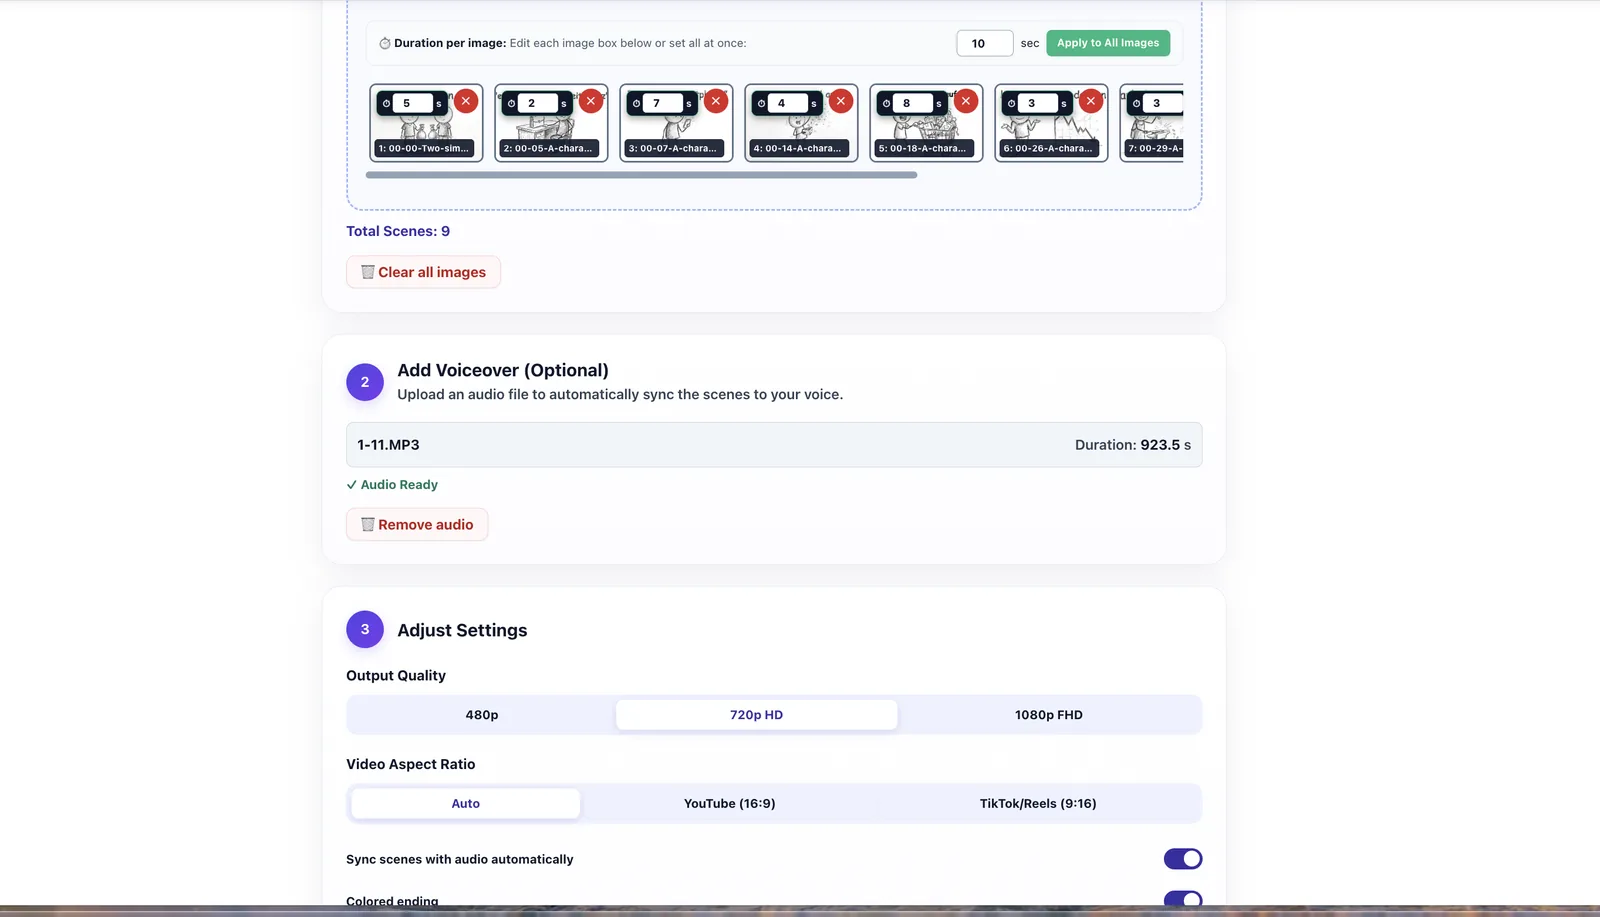
After the upload, your images appear as a row of thumbnails. Each thumbnail has a small box where you can type how many seconds that scene should last. To use one length for every scene, enter a value in the “Duration per image” field and click Apply to All Images.
In the example below, the file names 00-00, 00-05, 00-07 and 00-14 produced scene lengths of 5, 2, 7 and 4 seconds automatically, so no manual editing was needed.
If you want narration, use the optional voiceover step. Upload an MP3 or WAV file and the tool shows the file name, its length, and an “Audio Ready” confirmation. With Sync scenes with audio automatically switched on, the scenes follow your voice. Changed your mind? Click Remove audio.
Step 3: Adjust quality, aspect ratio and drawing hand
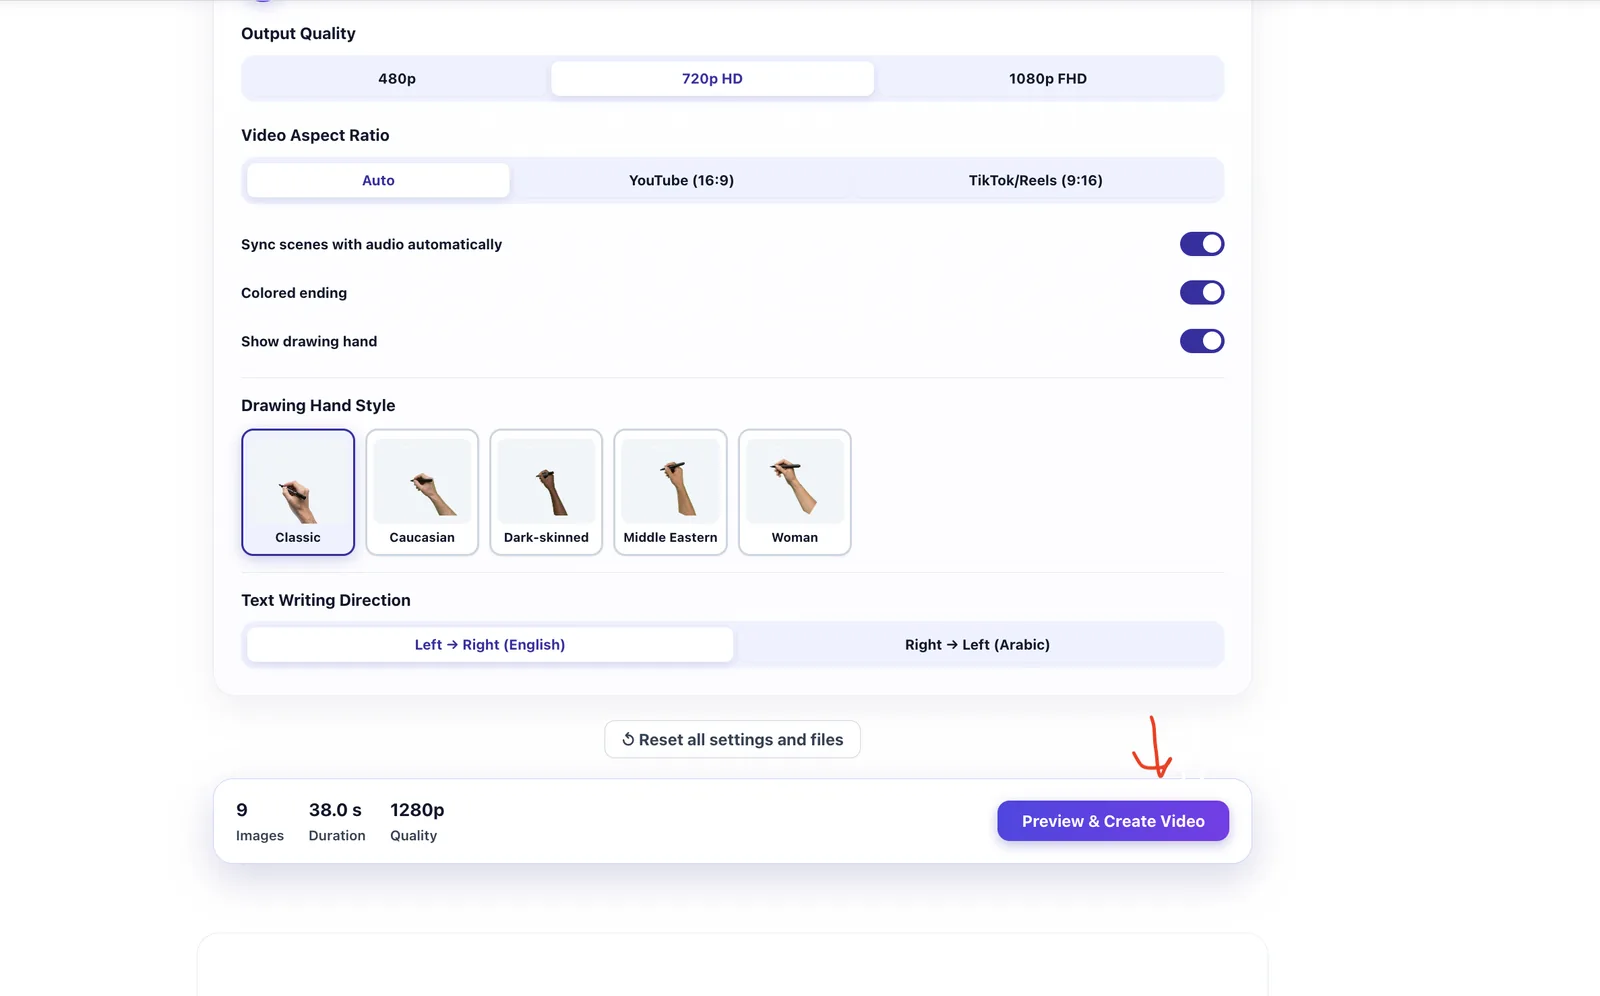
Scroll down to the settings. These are the options that shape how your whiteboard video looks:
- Output Quality: 480p, 720p HD or 1080p FHD. Higher resolutions give sharper lines but need more processing in your browser.
- Video Aspect Ratio: Auto, YouTube (16:9) for widescreen videos, or TikTok/Reels (9:16) for vertical videos.
- Toggles: sync scenes with audio automatically, colored ending, and show drawing hand.
- Drawing Hand Style: Classic, Caucasian, Dark-skinned, Middle Eastern or Woman.
- Text Writing Direction: left to right for English, or right to left for Arabic.
The summary bar at the bottom shows your number of images, total duration and quality before you create anything. When you are happy with the settings, click Preview & Create Video. If you want to start over, Reset all settings and files clears everything.
Step 4: Preview and fine-tune in the video editor
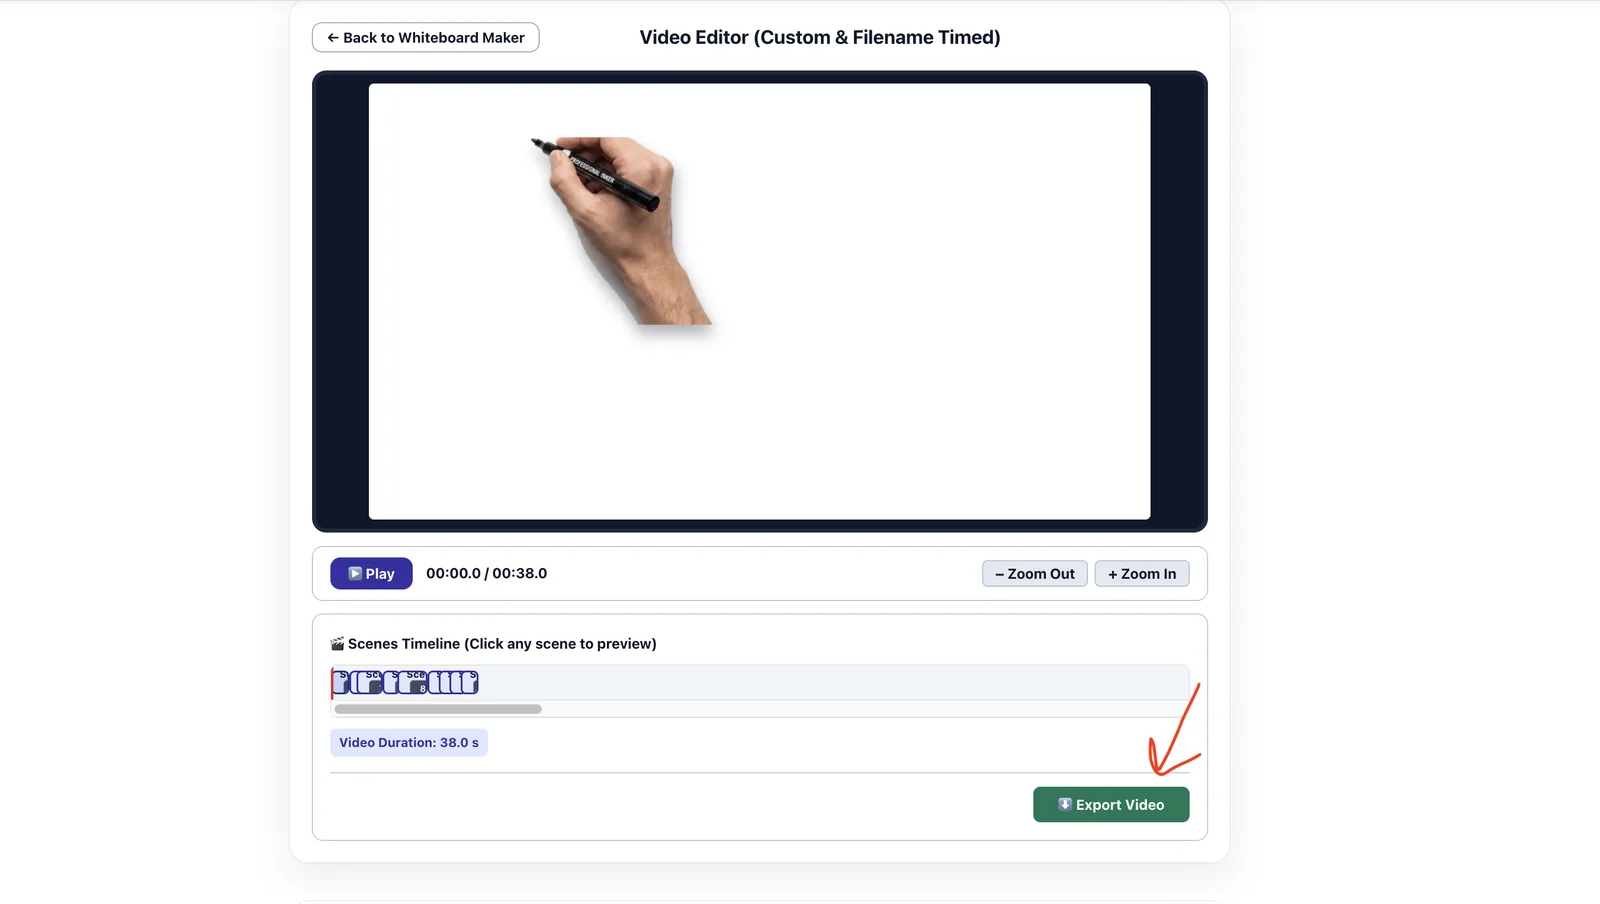
The video editor opens with a live preview. Press Play to watch your whiteboard animation, and follow the time counter above the timeline. Use Zoom In and Zoom Out to see the scenes more clearly, and click any scene in the Scenes Timeline to preview just that part.
If something needs changing, choose Back to Whiteboard Maker to adjust your images or settings. When the preview looks right, click Export Video.
Step 5: Rate, preview and download your video
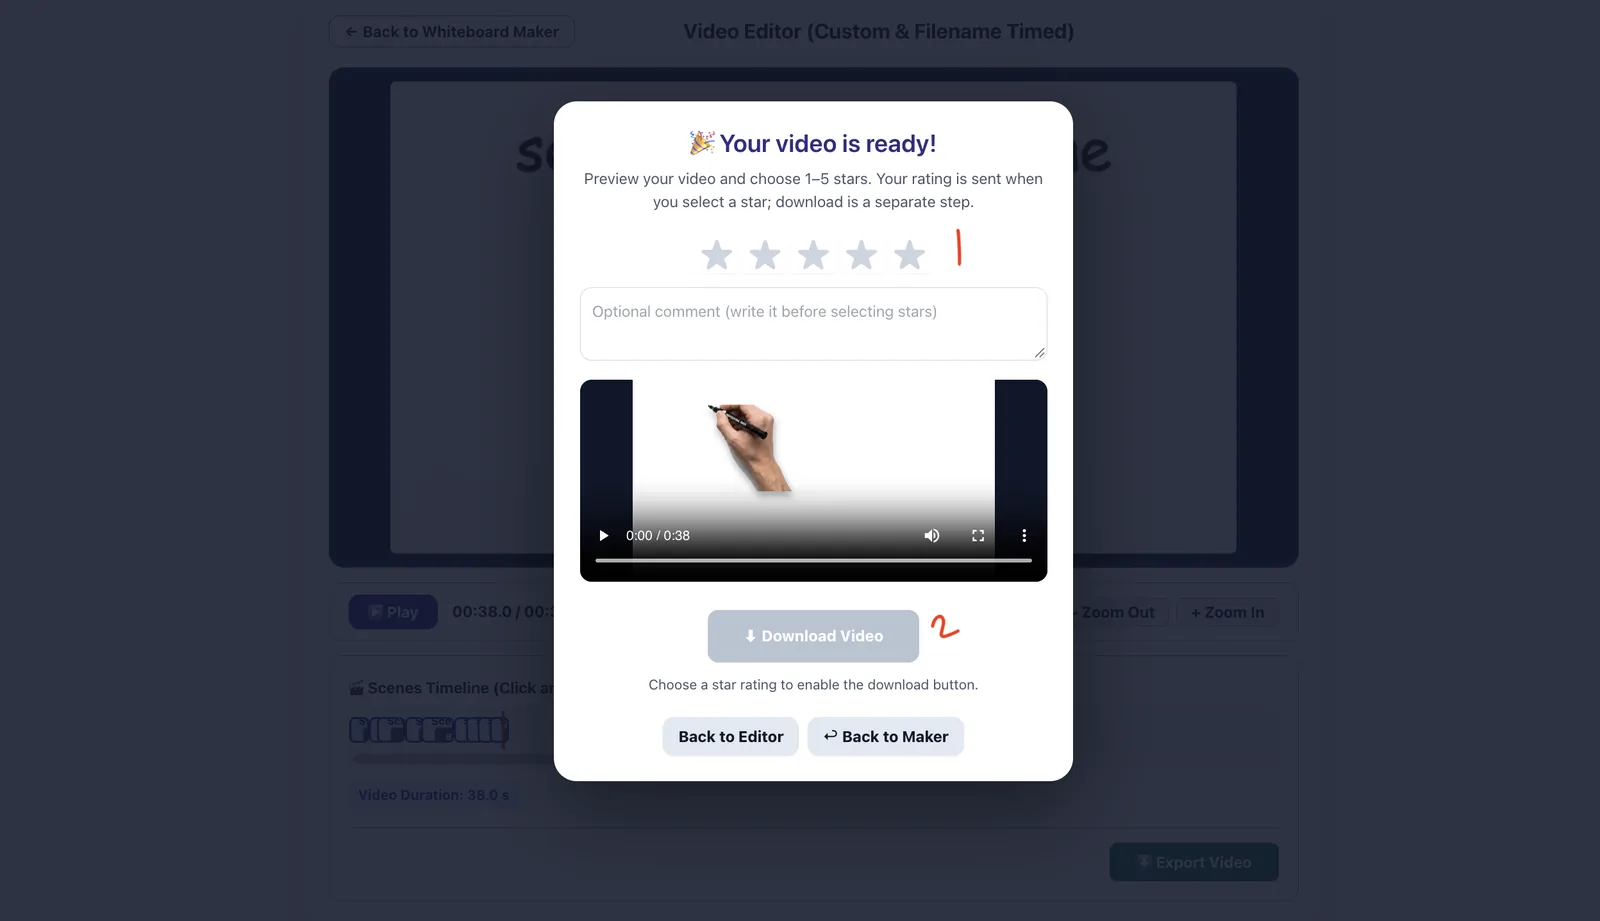
When the export finishes, a “Your video is ready!” window opens with a built-in player so you can watch the final result. Choose a 1–5 star rating (you can write an optional comment first) and the Download Video button becomes available. You can also go back to the editor or the maker if you want to change something.
Your video is saved as an MP4 with no watermark, ready for YouTube, lessons, presentations or social media.
How filename timing works
Smart filename timing lets you control scene lengths before you even open the timing boxes. Think of each file name as a timestamp (minutes and seconds) that marks when that scene starts. The gap between two timestamps becomes the length of the scene.
| File name | Scene starts | Scene length |
|---|---|---|
00-00.png | 0:00 | 5 seconds |
00-05.png | 0:05 | 7 seconds |
00-12.png | 0:12 | until the next timestamp |
This is especially useful if you already have a recorded voiceover or a script with timings. Name each image with the moment it should appear, upload the files, and the scene lengths are ready. Files without timestamps simply get 10 seconds each, and you can still edit any scene afterwards.
Tips for better whiteboard animation videos
- Use clean, high-contrast artwork. Black line art, diagrams and icons on a white background give the clearest drawing effect.
- Keep one idea per scene. Short scenes of about 2–5 seconds suit quick facts, while 7–10 seconds work better for a diagram that needs explaining.
- Pick the format first. Design your images for 16:9 if the video is for YouTube or a lesson, and for 9:16 if it is for TikTok, Reels or Shorts.
- Record the voiceover first. Then use filename timing or audio sync so the images appear exactly when you mention them.
- Test at 720p, finish at 1080p. Check pacing at a lower resolution, then export the final version at the quality you need.
- Use the other free tools around your video. Draft and flesh out your script with the paragraph expander, create storyboard artwork with the Image Prompt Generator, and write the upload text with the YouTube Description Maker.
Whiteboard video maker checklist: what to look for
Whichever whiteboard video maker you choose, these are the points worth checking before you invest time in a project:
- Watermark-free export, so the video is ready to publish.
- Browser-based processing, so you do not need to install software or upload private files.
- Control over timing, through duration boxes, timestamps or audio sync.
- Voiceover support for narrated explainers.
- Horizontal and vertical formats for YouTube and short-form platforms.
- Drawing hand options that suit your audience.
- Right-to-left writing support if you create Arabic content.
The ClearAITools whiteboard animation maker includes all of these.
Frequently asked questions
Is this whiteboard animation maker really free?
Yes. The tool is free and needs no account. The site is supported by advertising.
Does the video have a watermark?
No. Exported videos carry no ClearAITools watermark, and you receive the result as an MP4 file.
What image and audio formats can I use?
Use JPG or PNG for your images, and MP3 or WAV if you want to add a voiceover.
Are my images and audio uploaded to a server?
The whiteboard maker processes your images and audio in your browser. For details on how the rest of the site handles data, read the Privacy Policy.
Can I make vertical videos for TikTok, Reels or Shorts?
Yes. Choose the TikTok/Reels (9:16) aspect ratio before you create the video. For widescreen videos, choose YouTube (16:9).
Does it support Arabic or right-to-left text?
Yes. In the settings, set Text Writing Direction to Right → Left (Arabic). The default is Left → Right for English.
How do I set exact scene lengths?
Type a duration in the box on each image, use “Apply to All Images” for one length everywhere, or name your files with timestamps such as 00-00.png and 00-05.png. If you add a voiceover, the scenes can also sync to your audio.
Start making your whiteboard animation
You now know the full workflow: choose your images, set the timing or add a voiceover, adjust the quality and drawing hand, preview in the editor, and download your MP4. Because everything runs in your browser, you can try it on a short project right away and refine it as you go.